


The app I used to create my breakfast sandwich is called “IbisPaint.”
It is free to download and super easy to use once you get the hang of it.
- The application has very minimal pay walls.
Here is my step-by-step process on how I draw and render a breakfast sandwich:
1. Make a new canvas (doesn’t matter the size).
Go into IbisPaint or the art app you have on your device and choose a canvas size. As mentioned within the title, the size of the canvas does not matter as long as you have enough room to make the sandwich. The canvas size I personally use is 1:1 (2K) in ibispaint. After that is done, change the background color to any color you would like.
2. Choose any brush and sketch out the breakfast sandwich.
As the title suggests, use any brush and begin to sketch out the buns, eggs, and the bacon pieces of your breakfast sandwich. Remember, the sketch does not have to be perfect!
3. Use a thicker brush to outline your sketch.
Lower the opacity of your sketch and add a new layer above it. On that new layer, choose a different brush and change the size to be a little thicker. Once chosen, you can then begin to outline.
4. Add in your base color.
Hide the sketch layer (or delete it entirely) and add a new layer underneath the outline. If your outline has no gaps then use the bucket tool and fill in the empty space with white. If your outline does have gaps (like my breakfast sandwich above), use the lasso tool (found in the magic wand) and go over the gaps. Once closing them with the white base color, you can then use the bucket tool to fill in the space.
5. Search online for reference photos.
Go onto your web browser and search up “english muffin,” “Sunny side up eggs,” and “Bacon.” Once completed, insert the three images onto your canvas. Place them to the side and color drop the light part of the english muffin for a base.
6. Grab a particle or airbrush tool and begin to render / shade the top bun.
Color the top and bottom bun with the color you dropped from your reference. Then, swap the current brush you are using to a particle brush or airbrush (for my sandwich I used “airbrush (particle).” Make sure to alpha lock the layer before you continue rendering. Change the current base color gradually by color dropping it to get that toasted effect.
7. Lightly shade the bottom bun.
With an ever so slightly darker color from the reference, use the alpha lock button and lightly shade the bottom bun (no need to add a new layer simply use the base).
8. Add a new layer and clip it down to your base layer.
Add a new layer, put it above your base layer where you rendered the top and bottom bun and clip it down.
9. Begin to shade / render the two eggs.
Color pick from the reference you inserted and begin to use the airbrush / particle brush and lasso tool (with the opacity slider). Similarly to how you rendered the english muffin halves, analyze your reference and color accordingly. Remember to use the alpha lock for rendering once you have placed down the flat colors!
10. Add a new layer and clip it down.
Add a new layer, move it above your sunny side up egg layer and the base layer and clip it down.
11. Begin to shade & render the bacon pieces.
Like the rest of the sections, color drop from the bacon reference and begin to shade and render accordingly. For this step I used solely the air brush tool however, you can use whatever you feel most comfortable or suitable for your breakfast sandwich.
12. Color the outline layer. (Optional!)
Go back to your outlined layer and click on alpha lock. Choose a nice maroon or dark brown (warm tones only) and color it in. For a quicker result use the lasso tool.
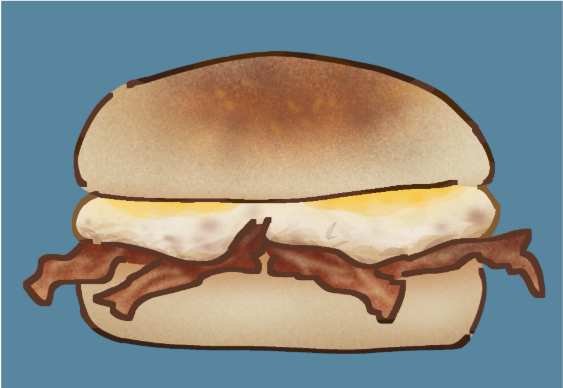
13. Tada! You’re finished!!
If you followed my mediocre tutorial, then congrats! You officially know how to draw and render a breakfast sandwich.